ASSIGNMENT I-2 Tree-Ring Skeleton Plots & Crossdating

[This is an Individual Assignment worth 20 pts distributed according to this GRADING RUBRIC]

              
It is DUE in the D2L DROPBOX at 11:59 pm on Tuesday Sep 28

CLICK HERE to leap directly
 to the I-2 Instructions
Need some extra help on the
assignment?
CLICK HERE

PRINTER FRIENDLY VERSION    [pdf]

You should be able to complete this assignment on your own by following the step-by-step directions in the assignment and after watching one or both of the DEMO VIDEOS prepared for you by one of our Tree-Ring Lab graduate students.  Each demo illustrates how to make a skeleton plot, pattern match, and crossdate.  Watch both to see it done for different cores.

Demo # 1
(good to start with - shows you how to magnify as you are plotting, plus erase and re-draw if you made a mistake)

Demo #2 
(uses a different core and at the end has directions for Mac users on how to save your final crossdated image)
CLICK HERE for directions for saving the crossdated image PC users.


[IMPORTANT: You will need to have Quicktime installed on your computer to see the demo podcast video]


To get started, go to the Laboratory of Tree-Ring Research (LTRR) website and click on Tree rings :
LTRR Website: 
www.ltrr.arizona.edu

LTRR website

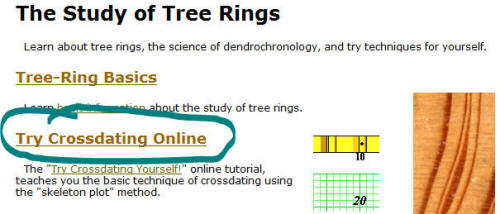
Then on the next screen, click on Try Crossdating Online to get to the Skeleton Plotting & Crossdating tutorial:

Crossdating link

 Here's the direct link to the Tutorial:
       
https://www.ltrr.arizona.edu/skeletonplot/introcrossdate.htm
Enlarge the window to full screen if necessary, or copy the link, and paste it into a new tab or window outside of D2L.


I-2 ASSIGNMENT STEP-BY-STEP INSTRUCTIONS

1.    Click on and READ through the Crossdating Tutorial's Explanatory Pages ( Items #1 through #11, esp. #6-11).  
       
Be sure to try out the examples at each step to learn what to do


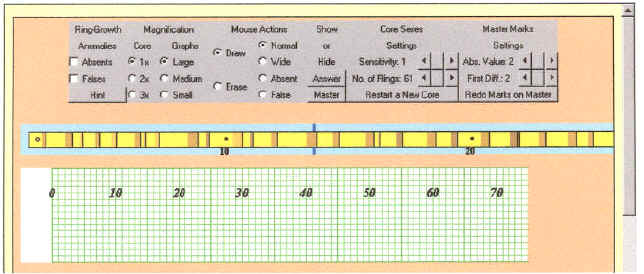
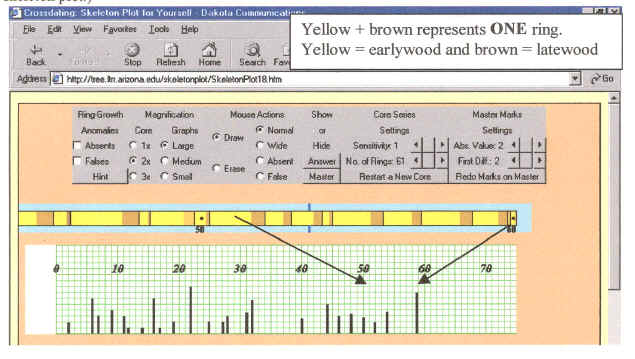
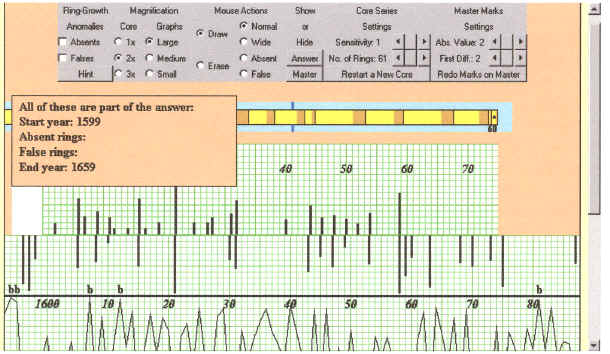
2.   Then click on #12, 'Try skeleton plotting for yourself' to begin your skeleton plot.    (The screen image should look like the figure below, but will have a thin red arrow marking the beginning (ring 0) and ending (ring 60) points on the graph paper)

.

3. Begin skeleton plotting!    BIG HINT:  CONCENTRATE on the narrow rings!! 

 4. To see the really tiny rings better, you can change the zoom on the core and the graph by clicking on    1x, 2x, or 3x for the core and large, medium, small for the graph paper. 

 5. If you make a mistake and put a mark on the wrong graph line or want to change the height of the mark, select 'ERASE' and click on that mark to erase it. Then re-select 'DRAW' to continue.

 6. Plot vertical marks for the narrowest rings -- the narrower the ring, the longer your mark (see tutorial #6 on "Making Skeleton Plots").  To make your mark, on the graph paper, click on the vertical green line that corresponds to the proper ring number at the height you want to assign to your mark (e.g., 8-10 grid lines up for REALLY narrow; 5-7 for quite narrow; 2-4 for narrow.)

 7. Move the core by clicking on it and dragging. You can use the blue marker line to keep track of the rings as you count and plot them. (See figure below for example of completed skeleton plot.)


8. When you have finished your skeleton plot of the core's 61 rings (rings 0 through 60, defined by the two red arrows on the graph paper), click on the MASTER button to reveal the master chronology's skeleton plot and ring width indices.

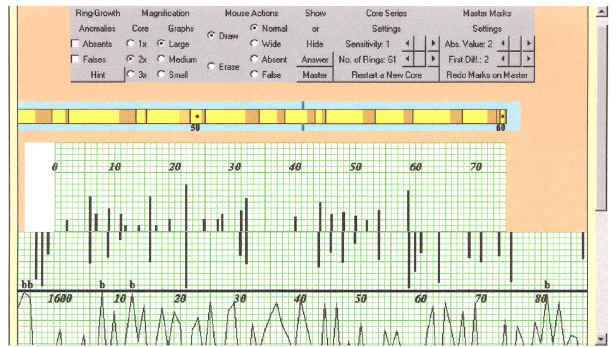
 9. To pattern match your skeleton plot with the master, click and drag the master until you find the match.
  
 (Here's an example of a correct pattern match:)


10. To crossdate your core after you find the match, find the Start Year (the year that corresponds with ring 0 on your plot) and End Year (the year for ring 60 on your plot).  

 11. When you think you have correctly matched and figured out the Start & End years, click on 'ANSWER' to confirm that you have correctly pattern matched and crossdated your core & plot.  (See the answer box on the figure below and note how the graph years match the answer box years.)


  12.  If your plot's Start & End years agree with the ANSWER, you have successfully skeleton plotted, pattern matched, and crossdated your core!!! 

 Now, keep your crossdated image on the screen and follow the DOCUMENT FORMAT DIRECTIONS below to COPY & SAVE it in a document for submission.


WHAT TO DO TO COMPLETE THE ASSIGNMENT
The I-2 Assignment is worth a total of 20 points.
Your submission must include:

·         Your NAME, NATS 101 Section # (51+52 or 53+54 ), Group #, the title "I-2", and the DATE.    

·         A "screen image" copy of your successfully crossdated plot. (total of 8 pts)
  [IMPORTANT:  See the I-2 Document Format Directions below for info on how to copy a screen image and see the I-2 Grading Rubric for specific guidelines about grading.]

·         A written summary (total of 10 pts)  of what you did which includes:

o   (2 pt) an explanation of skeleton plotting  (in your own words)

o   (2 pt) an explanation of pattern matching  (in your own words)

o   (2 pt) an explanation of cross dating  (in your own words)

o   (2 pts) an explanation of what a master chronology is and how it is used in cross dating.(in your own words)

o   (2 pts) a description of the terms complacency and sensitivity and an explanation of what these two types of ring patterns look like, followed by an explanation of which type is better for cross dating and why – all in your own words.

·         Top Two" (total of 2 pts)   Crossdating a complacent core

Directions:
  Repeat the skeleton plotting exercise, but this time with a complacent core and write a paragraph describing how it differed from the sensitive core exercise.  Here's the step-by-step:

o    After you've saved your previous crossdated image, change the SENSITIVITY from 1 (very sensitive) to 5 or 6 (more complacent). 

o    Then click "Restart a New Core" and try to plot, match, and crossdate the more complacent core. 

o    If you are successful, save the image as above ,and

o    Write a "Top Two" paragraph (~200-300 words) describing (a) the challenges of crossdating a complacent core and (b)explaining the specific techniques you used to meet this challenge and successfully get your plot to match the master (e.g., paid more attention to subtle changes in ring width, compared each ring to its adjacent rings to decide if it was "narrower" enough to draw a line, etc.)

.                               [IMPORTANT: see the Grading Rubric for more specifics]


 I-2 DOCUMENT FORMAT DIRECTIONS:  

With your crossdated image still on the screen, do a screen capture via  Print Screen and a copy of the computer screen image will be saved to the computer's temporary "clipboard."

CLICK HERE for directions on how to capture a "screen shot" on a PC
(you can also use the Snipping Tool in Vista or Windows 7 or download "Snippy" for XP)
      CLICK HERE for directions on how to capture a "screen shot" on  a Mac
(see DEMO #2 linked above for another way to do this on a Mac
)

Now start up MS Word and open a new document. Type your NAME, NATS 101 Section # (51+52 or 53+54), GROUP #, "I-2" and the date at the top of the page.  Then click on Paste (or hold down the Ctrl and V keys) and what you copied from the screen will be pasted into the document.  Below your plot, Type your written summary (if you like, you can wait and write this part up later.) 

red arrow pointing     Save the document in either .doc or PDF format  
Give it the name: I-2-lastname-firstname.doc (or I-2-lastname-firstname.pdf)  (inserting your last name and first name in the place indicated.) 


IMPORTANT:
  So that we can read your assignment, PLEASE SUBMIT IT IN .DOC or PDF  FORMAT ONLY (not .docx or .wps (Microsoft Works) pages or .odt. (Open Office)   Even if your word processing program is Word 2007 or Microsoft Works or Open Office, it should allow you the option to "save as" so you can save your file in the .doc format.  
If you are using a Mac, EXPORT it as a PDF or a .DOC and be sure the .pdf or .doc extension is at the end of you file name before you submit it.

red arrow pointing Submit it to the D2L DROPBOX BEFORE MIDNIGHT (specifically 11:59 pm) on Tuesday Sep 28th.  

 If you are in a computer lab and want to work on  the written part later before you submit it, you can
upload it to your D2L LOCKER or EMAIL your saved document to yourself  as an attachment and finish it to submit it later.)


Review of directions for submitting your I-2 ASSIGNMENT to the DROPBOX:

1) Click on Add a File below:

(2) Browse to find your I-2-lastname-firstname.doc (or .pdf)  FILE on your computer. 
After you find it and select it, click "open" to copy it into the upload bin.  

(3) click the UPLOAD button to upload your I-2 FILE from your computer to the UPLOAD holding bin.

(4)  When your I-2 FILE has been added, you may also add comments to the instructor if you wish, then click on the SUBMIT button at the very bottom of the screen to SUBMIT the file at once for grading. (You may need to scroll down to find the SUBMIT button!) 

(5)  A screen message will appear saying "File Submission Successful" with a link to your filesand another link saying "View submission history for this folder"

IMPORTANT: If you do NOT see the message "File Submission Successful" you have NOT YET properly uploaded your files -- so go back and carefully follow all the directions above and try again.  You should click on SUBMISSION HISTORY to double check that your submission has gone through successfully.